Shell介绍
1 docker run -itd --privileged --name centos7-shell centos:centos7.9.2009 /bin/bash
看懂shell
能改shell
能写shell
优化shell
shell是一个程序,用C语言编写,用户和linux内核沟通的桥梁。既是一种命令语言又是一种解释性的编程语言
• kernel:为软件服务,接受用户指令或软件指令驱动硬件,完成工作(外国人 收到翻译后的话)
• shell:解释器(翻译 翻译两个人话语)
• user:用户接口,对接用户(中国人说的汉语交给翻译)
1
2
3
4
5
6
7
8
[root@root sun]# echo "hello world" hello world [root@root sun]# echo "hello world" | sed 's/world/亲/' hello 亲 [root@root sun]# echo $USER sun [root@root sun]#
shell功能
• 命令行解释功能
• 启动程序
• 输入输出重定向
• 管道连接
• 文件名置换(echo/*)
• 变量维护
• 环境控制
• shell编程
shell脚本语法
如何抒写shell脚本
shell脚本的命名
a. 名字要有意义,不要太长
shell脚本格式
a. 开头指定运行环境 用#! 添加备注
1
2
3
4
5
6
7
8
9
10
11
12
13
14
15
16
17
18
19
20
21
22
23
24
25
26
27
28
29
30
31
32
33
[root@Centos8 shells]# cat nginx_install.sh yum -y install wget gcc pcre-devel zlib-devel wget http://nginx.org/download/nginx-1.16.0.tar.gz tar -zxvf nginx-1.16.0.tar.gz cd nginx-1.16.0./configure --prefix=/usr/local/nginx make -j 4 make install echo "hello Nginx is ending!" [root@Centos8 shells]#
shell脚本运行方法
1
2
3
4
5
6
7
8
9
10
11
12
13
14
15
16
17
18
19
20
21
22
23
24
25
26
27
28
[root@Centos8 shells]# ll total 1020 drwxr-xr-x 9 1001 1001 186 Apr 23 2019 nginx-1.16.0 -rw-r--r-- 1 root root 1032345 Apr 23 2019 nginx-1.16.0.tar.gz -rwx------ 1 root root 622 Apr 2 10:32 nginx_install.sh -rwx------ 1 root root 622 Apr 2 10:36 nginx_install_test.sh [root@Centos8 shells]# vim nginx_install_test.sh [root@Centos8 shells]# [root@Centos8 shells]# chmod 700 nginx_install.sh [root@Centos8 shells]# ./nginx_install_test.sh hello Nginx is Ending! [root@Centos8 shells]# sh nginx_install_test.sh hello Nginx is Ending! [root@Centos8 shells]# bash nginx_install_test.sh hello Nginx is Ending! [root@Centos8 shells]# mv nginx_install_test.sh nginx_test.sh [root@Centos8 shells]# ll total 1020 drwxr-xr-x 9 1001 1001 186 Apr 23 2019 nginx-1.16.0 -rw-r--r-- 1 root root 1032345 Apr 23 2019 nginx-1.16.0.tar.gz -rwx------ 1 root root 622 Apr 2 10:32 nginx_install.sh -rwx------ 1 root root 629 Apr 2 10:37 nginx_test.sh [root@Centos8 shells]# cat /etc/shells /bin/sh /bin/bash /usr/bin/sh /usr/bin/bash [root@Centos8 shells]#
shell的符号
~ 家目录
/- 返回上一次的目录
1
2
3
4
5
6
7
8
9
10
11
12
13
14
15
16
17
18
19
20
21
22
23
24
25
26
27
28
29
30
31
32
33
34
35
36
37
38
39
40
41
42
43
44
[root@Centos8 bin]# pwd /usr/bin [root@Centos8 bin]# cd ~ [root@Centos8 ~]# pwd /root [root@Centos8 ~]# cd - /usr/bin [root@Centos8 bin]# ! 执行历史命令 [root@Centos8 bin]# echo "hello" hello [root@Centos8 bin]# !! echo "hello" hello [root@Centos8 bin]# !p pwd /usr/bin [root@Centos8 bin]# $ 变量中取定值 [root@Centos8 bin]# echo $USER root [root@Centos8 bin]# / + - * \ % 对应数学运算加 减 乘 除 取余 [root@Centos8 bin]# expr 3 \+ 3 6 [root@Centos8 bin]# expr 3 \- 3 0 [root@Centos8 bin]# expr 3 \* 3 9 [root@Centos8 bin]# expr 3 \/ 3 1 [root@Centos8 bin]# expr 3 \% 3 0 [root@Centos8 bin]# & 后台执行 /* 星号是shell中的通配符,匹配所有 ? 问号是shell中的通配符,匹配除回车外的一个字符 ; 分好可以在shll中一行执行多个命令,命令间用分号分割 | 管道符,上一个命令的输出作为下一个命令的输入 cat filename | grep "abc" \ 转义字符 `` 反引号,命令中执行命令 echo "today is `date + %F ` " '' 单引号 脚本中字符串要用单引号引起来,但是不同意双引号的是,单引号不解释变量“ 双引号 脚本中出现的字符串可以用双引号引起来
管道
| 管道在shell中使用最多的,很多命令都是通过管道符输出,然后再通过grep再查找
1
2
3
4
[root@Centos8 shells]# cat /etc/passwd | grep "root" root:x:0:0:root:/root:/bin/bash operator:x:11:0:operator:/root:/sbin/noloagin [root@Centos8 shells]#
将命令的输出重定向到其他位置(比如文件)时可以用重定向
输出重定向(>(英文))
1
2
3
4
5
6
7
8
9
10
11
12
13
14
15
16
17
18
19
20
21
22
23
24
25
26
27
28
29
30
31
32
33
34
35
36
37
38
39
40
(JupyterNotebook) [admin@centos7 scripts]$ cat test6.sh date > test6_redirection.logwho >> test6_redirection.log(JupyterNotebook) [admin@centos7 scripts]$ ./test6.sh (JupyterNotebook) [admin@centos7 scripts]$ ll total 44 -rwxrwxr-x 1 admin admin 694 Nov 13 15:40 a-chmod-777.sh -rwxrwxr-x 1 admin admin 295 Nov 13 20:22 a-script-copy.sh -rwxrwxr-x 1 admin admin 297 Nov 13 20:28 a-script-demo.sh -rwxrwxr-x 1 admin admin 392 Nov 13 16:00 test1.sh -rwxrwxr-x 1 admin admin 379 Nov 13 17:12 test2.sh -rwxrwxr-x 1 admin admin 420 Nov 13 19:48 test3.sh -rwxrwxr-x 1 admin admin 418 Nov 13 19:56 test4.sh -rwxrwxr-x 1 admin admin 534 Nov 13 20:11 test5_221113.log -rwxrwxr-x 1 admin admin 474 Nov 13 20:10 test5.sh -rw-rw-r-- 1 admin admin 193 Nov 13 20:28 test6_redirection.log -rwxr-xr-x 1 admin admin 539 Nov 13 20:27 test6.sh (JupyterNotebook) [admin@centos7 scripts]$ cat test6_redirection.log Sun Nov 13 20:28:36 CST 2022 root pts/4 2022-11-13 19:36 (114.254.0.50) admin pts/6 2022-11-13 19:36 (114.254.0.50) root pts/3 2022-11-13 17:23 (114.242.250.71) (JupyterNotebook) [admin@centos7 scripts]$
输入重定向(<(英文))
输入重定向是文件的内容重定向至命令
command < inputfile
wc 可以统计数据中的文本,默认情况下会输出3个值
文本的行数
文本的单词数
文本的字节数
1
2
3
(JupyterNotebook) [admin@centos7 scripts]$ wc < test6.sh 19 43 495 (JupyterNotebook) [admin@centos7 scripts]$
内连输入重定向(<<)
使用此符号时,必须指定一个文本标记来划分输入数据的起止。任何字符串都可以作为文本标记,但在数据开始和结尾的文本标记必须一致
1
2
3
commond << marker date marker
1
2
3
4
5
6
7
8
9
10
11
12
13
14
(JupyterNotebook) [admin@centos7 scripts]$ wc << EOF > test data 1 > test data e > test data 3 > EOF 3 9 36 (JupyterNotebook) [admin@centos7 scripts]$ (JupyterNotebook) [admin@centos7 scripts]$ wc << END > TEST DATA 1 > TEST DATA 2 > END 2 6 24 (JupyterNotebook) [admin@centos7 scripts]$
重定向
/> 重定向输入
/>> 重定向追加输入
< 重定向输出
<< 重定向追加输出
1
2
3
4
5
6
7
8
9
10
11
12
13
14
15
16
17
18
19
20
21
22
23
24
25
26
27
28
29
30
31
32
33
34
35
36
37
38
[root@Centos8 shells]# ll total 1020 drwxr-xr-x 9 1001 1001 186 Apr 23 2019 nginx-1.16.0 -rw-r--r-- 1 root root 1032345 Apr 23 2019 nginx-1.16.0.tar.gz -rwx------ 1 root root 622 Apr 2 10:32 nginx_install.sh -rwx------ 1 root root 629 Apr 4 22:33 nginx_test.sh [root@Centos8 shells]# pwd /root/shells [root@Centos8 shells]# echo haha > ./forward.txt [root@Centos8 shells]# ll total 1024 -rw-r--r-- 1 root root 5 Apr 4 22:41 forward.txt drwxr-xr-x 9 1001 1001 186 Apr 23 2019 nginx-1.16.0 -rw-r--r-- 1 root root 1032345 Apr 23 2019 nginx-1.16.0.tar.gz -rwx------ 1 root root 622 Apr 2 10:32 nginx_install.sh -rwx------ 1 root root 629 Apr 4 22:33 nginx_test.sh [root@Centos8 shells]# cat forward.txt haha [root@Centos8 shells]# echo haha1 > ./forward.txt [root@Centos8 shells]# cat forward.txt haha1 [root@Centos8 shells]# echo haha2 > ./forward.txt [root@Centos8 shells]# cat forward.txt haha2 [root@Centos8 shells]# echo haha1 > ./forward.txt [root@Centos8 shells]# echo haha2 >> ./forward.txt [root@Centos8 shells]# cat forward.txt haha1 haha2 [root@Centos8 shells]# echo haha3 >> ./forward.txt [root@Centos8 shells]# cat forward.txt haha1 haha2 haha3 [root@Centos8 shells]# wc < forward.txt 3 3 18 [root@Centos8 shells]# wc forward.txt 3 3 18 forward.txt
shell数学运算
expr
1
2
3
4
5
6
7
8
9
10
11
12
13
(JupyterNotebook) [admin@centos7 StudyScripts]$ expr 1 + 2 3 (JupyterNotebook) [admin@centos7 StudyScripts]$ expr 1 - 2 -1 (JupyterNotebook) [admin@centos7 StudyScripts]$ expr 1 * 2 expr : syntax error(JupyterNotebook) [admin@centos7 StudyScripts]$ expr 1 \* 2 2 (JupyterNotebook) [admin@centos7 StudyScripts]$ expr 1 / 2 0 (JupyterNotebook) [admin@centos7 StudyScripts]$ expr 1 % 2 1 (JupyterNotebook) [admin@centos7 StudyScripts]$
使用方括号
为了兼容Bourne shell,bash shell保留了expr命令,但同时也提供了另一种更简单的方法执行数学运算。在bash中,要将数学运算结果赋给变量,可以使用$和方括号($[operation]),获取变量值通过 $变量名。
1
2
3
4
5
6
7
(JupyterNotebook) [admin@centos7 StudyScripts]$ var1=$[ 1 + 5 ] (JupyterNotebook) [admin@centos7 StudyScripts]$ echo $var1 6 (JupyterNotebook) [admin@centos7 StudyScripts]$ var2=$[$var1 *2] (JupyterNotebook) [admin@centos7 StudyScripts]$ echo $var2 12 (JupyterNotebook) [admin@centos7 StudyScripts]$
脚本退出
查看退出状态码
Linux提供了专门的变量$?来保存最后一个已执行命令的退出状态码。
Linux退出状态码
状态码
描述
0
命令成功结束
1
一般性未知错误
2
不适合的shell命令
126
命令无法执行
127
没找到命令
128
无效的退出参数
128+x
与Linux信号x相关的严重参数
130
通过Ctrl+C终止命令
255
正常范围之外的退出状态码
exit
exit
格式化输出
echo语法
功能:将内容输出到默认显示设备
echo命令的功能是在显示器上显示一段文字,一般起到一个提示的作用。 功能说明:显示文字。
1
2
3
4
5
6
7
8
9
10
11
12
13
14
15
16
17
18
19
20
21
22
23
24
25
26
27
28
29
30
31
32
33
34
35
36
37
38
39
40
41
42
43
44
45
46
47
48
49
50
51
52
53
54
55
56
57
58
59
60
61
62
63
64
65
66
67
[root@Centos8 ~]# echo "Login:" ;read Login: 11 [root@Centos8 ~]# echo -n "Login:" ;read Login:22 [root@Centos8 ~]# echo -n "Date:" ;date +%F Date:2022-04-05 [root@Centos8 ~]# echo "Date:" ;date +%F Date: 2022-04-05 [root@Centos8 ~]# 语法:echo [-ne][字符串] 补充说明: 1、echo 会将输入的字符串送往标准输出。 2、输出的字符串间以空白字符隔开,并在最后加上换行号。 OPTIONS: -n 不要在最后自动换行 -e 若字符串中出现以下字符,则特别加以处理,而不会将它当成一般文字输出: 转义字符 \a 发出警告声; \b 删除前一个字符; \t 插入tab; \n 换行且光标移至行首; \c 最后不加上换行符号; \f 换行但光标仍旧停留在原来的位置; \r 光标移至行首,但不换行; \v 与\f相同; \ 插入\字符; \0nnn 打印nnn(八进制)所代表的ASCII字符; 备注:数字0 不要理解成字母o \xNN 打印NN(十六进制)所代表的ASCII字符; -–help 显示帮助 -–version显示版本信息 [root@Centos8 ~]# echo -e "\a123" 123 [root@Centos8 ~]# echo -e "123\b" 123 [root@Centos8 ~]# echo -e "\b123" 123 [root@Centos8 ~]# echo -e "\t123" 123 [root@Centos8 ~]# echo -e "12\n3" 12 3cat [root@Centos8 ~]# echo -e "\c123" [root@Centos8 ~]# echo -e "\f123" 123 [root@Centos8 ~]# echo -e "\r123" 123 [root@Centos8 ~]# echo -e "\v12\n3" 12 3 [root@Centos8 ~]# 你的进制转换过关吗? [root@zutuanxue ~]# echo -e "\0123" S [root@zutuanxue ~]# echo -e "\x61" a
1
2
3
4
5
6
7
8
9
#!/bin/bash for time in $(seq 9 -1 0);do echo -ne "\b$time " ;sleep 1 done echo -e "\a"
颜色输出
脚本中echo显示内容带颜色显示,echo显示带颜色,需要使用参数-e
1 echo -e "\033[字背景颜色;文字颜色m字符串\033[0m"
1
2
3
4
5
例如: echo -e “\033[41;36m something here \033[0m” 其中41的位置代表底色, 36m的位置是代表字的颜色 1、字背景颜色和文字颜色之间是英文的 2、文字颜色后面有个m 3、字符串前后可以没有空格,如果有的话,输出也是同样有空格
下面是相应的字和背景颜色,可以自己来尝试找出不同颜色搭配
1
2
3
4
5
6
7
8
9
10
11
12
13
14
15
16
17
18
19
20
21
22
23
24
25
26
27
28
29
30
31
32
33
34
35
36
37
38
39
40
41
42
43
44
45
46
47
48
49
50
51
52
53
54
55
56
例 echo -e “\033[31m 红色字 \033[0m” echo -e “\033[34m 黄色字 \033[0m” echo -e “\033[41;33m 红底黄字 \033[0m” echo -e “\033[41;37m 红底白字 \033[0m” 字颜色:30—–37 echo -e “\033[30m 黑色字 \033[0m” echo -e “\033[31m 红色字 \033[0m” echo -e “\033[32m 绿色字 \033[0m” echo -e “\033[33m 黄色字 \033[0m” echo -e “\033[34m 蓝色字 \033[0m” echo -e “\033[35m 紫色字 \033[0m” echo -e “\033[36m 天蓝字 \033[0m” echo -e “\033[37m 白色字 \033[0m” 字背景颜色范围:40—–47 echo -e “\033[40;37m 黑底白字 \033[0m” echo -e “\033[41;37m 红底白字 \033[0m” echo -e “\033[42;37m 绿底白字 \033[0m” echo -e “\033[43;37m 黄底白字 \033[0m” echo -e “\033[44;37m 蓝底白字 \033[0m” echo -e “\033[45;37m 紫底白字 \033[0m” echo -e “\033[46;37m 天蓝底白字 \033[0m” echo -e “\033[47;30m 白底黑字 \033[0m” 最后面控制选项说明 \033[0m 关闭所有属性 \033[1m 设置高亮度 \033[4m 下划线 \033[5m 闪烁 \033[7m 反显 \033[8m 消隐 \033[30m — \33[37m 设置前景色 \033[40m — \33[47m 设置背景色 \033[nA 光标上移n行 \033[nB 光标下移n行 \033[nC 光标右移n行 \033[nD 光标左移n行 \033[y;xH设置光标位置 \033[2J 清屏 \033[K 清除从光标到行尾的内容 \33[s 保存光标位置 \033[u 恢复光标位置 \033[?25l 隐藏光标 \033[?25h 显示光标 用法例子 光标下移三行 [root@zutuanxue ~]# echo -e "\033[0m today is fine \033[3B" today is fine
fruits_shop.sh
需求:输出一个水果购物界面 fruits_shop.sh
案例要点:
• echo输出缩进问题
1
2
3
4
5
6
7
8
9
10
11
#!/bin/bash echo -e "\t\t \033[32m Fruits List \033[0m \n" echo -e "\t \033[31mFruit\033[0m \t\t \033[31mPrice\033[0m \t\t\033[31mWeight\033[0m" echo -e "\t\033[34m1)Apple\t\t¥10.00\t\t1KG\033[0m" echo -e "\t\033[34m2)Banana\t¥9.00\t\t1KG\033[0m" echo -e "\t\033[34m3)Orange\t¥15.20\t\t1KG\033[0m"
格式化输入
read命令
默认接受键盘的输入,回车符代表输入结束
read命令选项
• -p打印信息
1
2
3
4
5
6
7
8
9
10
11
12
13
14
15
16
17
18
[root@Centos8 shells]# cat read_command_study.sh clear read -p "Login:" accecho -ne "Password:" read -s -t10 -n6 pwd echo echo -e "account:$acc \tpassword:$pwd " [root@Centos8 shells]# bash read_command_study.sh Login:root Password: account:root password:123456 [root@Centos8 shells]#
1
2
3
4
5
6
7
8
9
10
11
12
13
14
15
16
17
[root@Centos8 shells]# cat login.sh clear echo "Centos Linux 8 (Core)" echo -e "Kernel 'uname -r ' an ' uname -m '\n" echo -ne "$HOSTNAME login: " read accread -p "Password: " pwd [root@Centos8 shells]# bash login.sh Centos Linux 8 (Core) Kernel 'uname -r ' an ' uname -m ' Centos8 login: root Password: 123456
shell变量
变量介绍
在编程中,我们总有一些数据需要临时存放在在内存,以待后学使用时快速读出
1
2
3
4
5
6
7
8
9
10
11
12
13
14
计算机的单位: 1B=8bit 1KB=1024B 1MB=1024KB 1GB=1024MB 1TB=1024GB 1PB=1024TB 1EB=1024PB 1ZB=1024EB ... 好了,已经够大了!当然还有YB、BB更大的单位,同样进制也是1024. 1G=1024*1024*1024=1073741824B
假如你将一个1B的字符存入内存,如何读出呢?有没有一种大海捞针的感觉啊!我们讨论一下计算机是如何通过让我们人类快速将数据存在内存,如何从内存中读出数据的。我们研究过变量后就明白了。
变量:变量是编程中最常用的一种临时在内存中存取数据的一种方式。
变量存取原理
1
2
3
4
5
6
7
8
9
10
11
12
13
关于内存的说明 a、系统启动 内存被按照1B一个单位划分成N块 并且以十六进制为每一个空间编号 b、内存跟踪表记录 使用和未使用的内存的地址编号 c、内存申请 系统从未使用的内存中拿出一个或者一段连续空间 给你使用 同时在内存跟踪表中记录 该地址被占用不在分给别人,同时在系统中建立映射机制 比如:变量名 STRING1=‘ABC’ name<==>0x5 d、释放内存 从内存跟踪表中将记录删除,下次存数据直接覆盖
1
2
3
4
5
6
7
8
CHAR1(0x3)=A 从图片可以看出,当我们在脚本中定义变量存值的时候,可以从以下方面看到变化: a、内存占用:如果存的是一个字符则占用1个字节,如果存的是字符串则是字符串的长度加1个字节长度(\0是一个 特殊字符,代表字符串结束)。 b、变量名与内存空间关系:计算机中会将对应的内存空间地址和变量名称绑定在一起,此时代表这段内存空间已经被 程序占用,其他程序不可复用;然后将变量名对应的值存在对应内存
变量定义
什么时候需要定义变量?
如果某个内容需要多次使用,并且在代码中重复出现,那么可以用变量代表该内容。这样在修改内容的时候,仅仅需要修改变量的值。
定义一个变量
变量格式: 变量名=值
• 命名只能使用英文字母,数字和下划线,首个字符不能以数字开头。
• 中间不能有空格,可以使用下划线(_)。
• 不能使用标点符号。
• 不能使用bash里的关键字(可用help命令查看保留关键字)。
定义变量举例:
1
2
3
注意:字符串要用单引号或双引号引起来 建议变量名为大写,和命令区分 _name
定义变量演示:
1
2
3
4
5
变量赋值,此种方法设置为本地变量 [root@zutuanxue ~]# name="baism" [root@zutuanxue ~]# school='ayitula' [root@zutuanxue ~]# age=30 [root@zutuanxue ~]# score=88.8
取消变量 unset
取消当前环境中的变量,如果是变量设置是保存在文件中,下次重启又会恢复
1
2
[root@zutuanxue ~]# unset name [root@zutuanxue ~]# echo $name
有类型变量 declare
i 整形变量 将变量看成整数
-r 只读变量 使变量只读 readonly,该变量的值无法改变,并且不能为unset
-x 全局变量标记变量通过环境导出 export
-a 索引数组 指定为索引数组(普通数组);查看普通数组
-A 关联数组 指定为关联数组 查看关联数组
1
2
3
4
5
6
7
8
9
10
11
12
13
14
15
16
17
18
19
[root@zutuanxue ~]# declare -i num='asa' [root@zutuanxue ~]# echo $num 0 [root@zutuanxue ~]# num=100 [root@zutuanxue ~]# echo $num 100 [root@zutuanxue ~]# declare -r num [root@zutuanxue ~]# echo $num 100 [root@zutuanxue~]# num=200 -bash: num: 只读变量 [root@zutuanxue ~]# declare -x declare -x HISTCONTROL="ignoredups" declare -x HISTSIZE="1000" declare -x HOME="/root" declare -x HOSTNAME="Bai_Shuming" declare -x LANG="zh_CN.UTF-8" declare -x LESSOPEN="||/usr/bin/lesspipe.sh %s"
变量分类
本地变量
定义在脚本或当前终端中,脚本执行完毕或终端结束变量失效
环境变量
定义在用户家目录下的.bashrc或.bash_profile文件中,私有变量,只能本用户使用
查看用户的环境变量 env( | wc -l)
查询当前用户的所有变量(临时变量与环境变量) set (| wc -l)
将当前环境变量变成环境变量 export
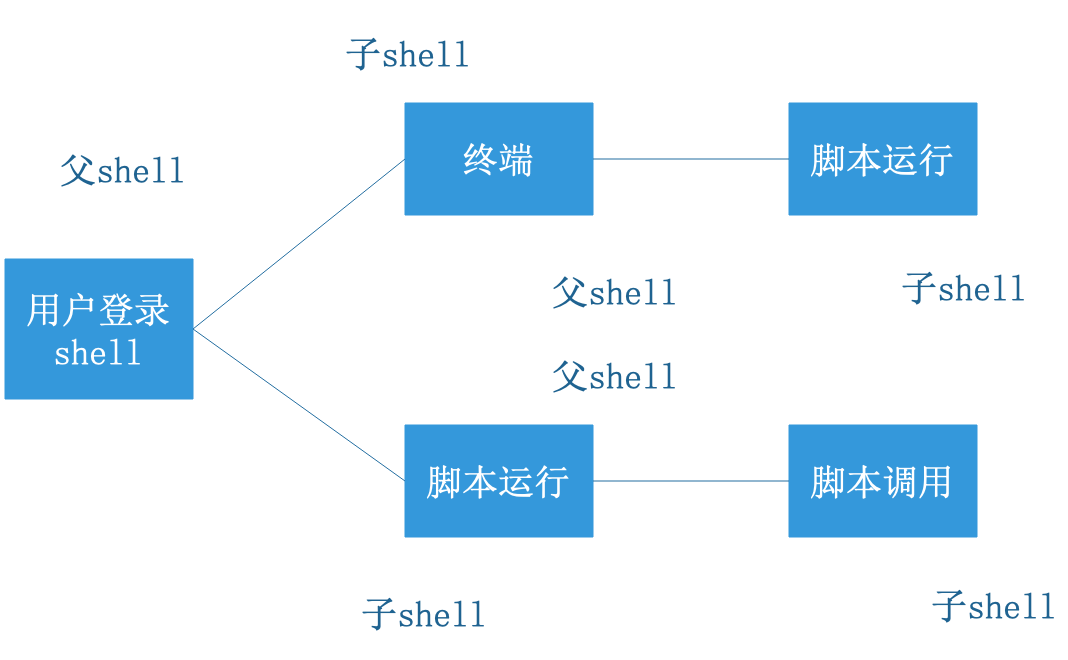
1
2
3
4
5
6
7
8
9
10
11
12
13
14
15
16
17
18
19
20
21
22
23
24
25
26
27
28
29
30
31
32
33
34
35
36
37
38
39
40
41
42
43
44
45
46
定义一个临时变量 1、 [root@zutuanxue tmp]# export A=hello //临时将一个本地变量(临时变量)变成环境变量 [root@zutuanxue tmp]# env |grep ^A A=hello 2、 [root@zutuanxue tmp]# A=HELLO [root@zutuanxue tmp]# export A 3、定义一个永久生效变量: vim .bash_profile 或者 ~/.bashrc A=hello 关于export 说明 用户登录时: 1) 用户登录到Linux系统后,系统将启动一个用户shell。在这个shell中,可以使用shell命令或声明变量,也可以 创建并运行 shell脚本程序。 运行脚本时: 2) 运行shell脚本程序时,系统将创建一个子shell。此时,系统中将有两个shell,一个是登录时系统启动的shell, 另一个是系统为运行脚本程序创建的shell。当一个脚本程序运行完毕,它的脚本shell将终止,可以返回到执行该脚本 之前的shell。 从这种意义上来说,用户可以有许多 shell,每个shell都是由某个shell(称为父shell)派生的。 在子shell中定义的变量只在该子shell内有效。如果在一个shell脚本程序中定义了一个变量,当该脚本程序运行时, 这个定义的变量只是该脚本程序内的一个局部变量,其他的shell不能引用它,要使某个变量的值可以在其他shell中 被改变,可以使用export 命令对已定义的变量进行输出。 export 命令将使系统在创建每一个新的shell时定义这个变量的一个拷贝。这个过程称之为变量输出。[root@Centos8 ~]# _age=88 [root@Centos8 ~]# _name='baism' [root@Centos8 ~]# export _name [root@Centos8 ~]# vim var_test.sh [root@Centos8 ~]# [root@Centos8 ~]# [root@Centos8 ~]# bash var_test.sh baism [root@Centos8 ~]# cat var_test.sh echo $_age echo $_name [root@Centos8 ~]#
父shell与子shell
全局变量
使用export命令将本地变量输出为当前shell中的环境变量所有用户及shell都可以使用,可以在/etc/profile /etc/bashrc下永久定义
打印全局变量 printenv
内置变量
系统变量(内置bash中变量) : shell本身已经固定好了它的名字和作用.
1
2
3
4
5
6
7
8
9
10
11
12
13
14
15
16
17
18
19
20
21
22
23
24
25
26
27
28
29
30
31
32
33
34
35
36
37
38
39
40
41
42
43
44
45
46
47
48
49
50
51
52
53
54
55
56
57
58
$?:上一条命令执行后返回的状态,当返回状态值为0时表示执行正常,非0值表示执行异常或出错 若退出状态值为0,表示命令运行成功 若退出状态值为127,表示command not found 若退出状态值为126,表示找到了该命令但无法执行(权限不够) 若退出状态值为1&2,表示没有那个文件或目录 $$:当前所在进程的进程号 echo $$ eg:kill -9 `echo $$` = exit 退出当前会话 $!:后台运行的最后一个进程号 (当前终端) !$ 调用最后一条命令历史中的参数 !! 调用最后一条命令历史 $# :脚本后面接的参数的个数$*:脚本后面所有参数,参数当成一个整体输出,每一个变量参数之间以空格隔开 $@ : 脚本后面所有参数,参数是独立的,也是全部输出$0 :当前执行的进程/程序名 echo $0 $1 ~$9 位置参数变量${10} ~${n} 扩展位置参数变量 第10个位置变量必须用{}大括号括起来./1.sh a b c [root@zutuanxue shell01]# cat 2.sh echo "\$0 = $0 " echo "\$# = $# " echo "\$* = $*" echo "\$@ = $@ " echo "\$1 = $1 " echo "\$2 = $2 " echo "\$3 = $3 " echo "\$11 = ${11} " echo "\$12 = ${12} " 了解$*和$@ 的区别: $* :表示将变量看成一个整体 $@ :表示变量是独立的for i in "$@ " do echo $i done echo "======我是分割线=======" for i in "$*" do echo $i done [root@zutuanxue shell01]# bash 3.sh a b c a b c ======我是分割线======= a b c
变量比较
变量总结说明:
本地变量:当前用户自定义的变量。当前进程中有效,其他进程及当前进程的子进程无效。
环境变量:当前进程有效,并且能够被子进程调用。
全局变量:全局所有的用户和程序都能调用,且继承,新建的用户也默认能调用.
内置变量:shell本身已经固定好了它的名字和作用.
变量类型
作用域
生命周期
本地变量
当前shell环境(子shell不能用)
脚本结束或终端结束
环境变量
当前shell或者子shell
当前进程结束
全局变量
所有用户及shell环境
关机
内置变量
所有用户及shell环境
关机
变量管理
shell数组
数组介绍
默认数组
关联数字
shell五大运算符
1
2
3
4
5
6
7
8
9
10
11
12
13
14
15
16
17
18
19
20
21
22
23
24
1. 基本语法 $[运算式] 2. 实例 计算(2+3)*4 [root@Centos8 shells]# s=$[(2+3)*4] [root@Centos8 shells]# echo $s 20 [root@Centos8 shells]# expr 2 + 3 5 [root@Centos8 shells]# echo $[(2+3)*4] 20 [root@Centos8 shells]# expr 1+2 1+2 [root@Centos8 shells]# expr 1 + 2 3 [root@Centos8 shells]# expr 1 - 2 -1 [root@Centos8 shells]# expr 1 \* 2 2 [root@Centos8 shells]# expr 6 \/ 2 3 [root@Centos8 shells]# expr 6 \% 4 2 [root@Centos8 shells]#
赋值
数学
比较
关系
文件类型比较
条件控制
基本语法
1
2
3
4
5
6
7
8
9
10
11
12
13
14
15
16
17
18
[root@Centos8 shells]# a=hello [root@Centos8 shells]# echo $a hello [root@Centos8 shells]# test $a =hell (0为真 1为假) [root@Centos8 shells]# test $a = pell [root@Centos8 shells]# echo $? 1 [root@Centos8 shells]# test $a = hello [root@Centos8 shells]# echo $? 0 [root@Centos8 shells]# [ $a = Hello ] [root@Centos8 shells]# echo $? 1 [root@Centos8 shells]# [ $a = hello ] [root@Centos8 shells]# echo $? 0 [root@Centos8 shells]#
常用判断条件
1
2
3
4
5
6
7
8
9
10
11
12
13
14
15
16
17
18
19
20
21
22
23
24
25
26
27
28
29
30
31
32
33
34
35
36
37
38
39
40
41
42
43
44
45
46
47
48
49
50
[root@Centos8 shells]# [ 4 -eq 3 ] [root@Centos8 shells]# echo $? 1 [root@Centos8 shells]# [ 4 -ne 3 ] [root@Centos8 shells]# echo $? 0 [root@Centos8 shells]# [ 4 -lt 3 ] [root@Centos8 shells]# echo $? 1 [root@Centos8 shells]# [ 4 -gt 3 ] [root@Centos8 shells]# echo $? 0 [root@Centos8 shells]# [ 4 -le 3 ] [root@Centos8 shells]# echo $? 1 [root@Centos8 shells]# [ 4 -ge 3 ] [root@Centos8 shells]# echo $? 0 [root@Centos8 shells]# [root@Centos8 shells]# [ -r add.sh ] [root@Centos8 shells]# echo $? 0 [root@Centos8 shells]# [ -x add.sh ] [root@Centos8 shells]# echo $? 0 [root@Centos8 shells]# [ -w add.sh ] [root@Centos8 shells]# echo $? 0 [root@Centos8 shells]# [root@Centos8 shells]# [ -e add.sh ] [root@Centos8 shells]# echo $? 0 [root@Centos8 shells]# [ -f add.sh ] [root@Centos8 shells]# echo $? 0 [root@Centos8 shells]# [ -d add.sh ] [root@Centos8 shells]# echo $? 1 [root@Centos8 shells]# [root@Centos8 shells]#a=15 [root@Centos8 shells]# [ $a -lt 20 ] && echo "$a < 20" || echo "$a > 20" 15 < 20 [root@Centos8 shells]# a=159 [root@Centos8 shells]# [ $a -lt 20 ] && echo "$a < 20" || echo "$a > 20" 159 > 20 [root@Centos8 shells]#
流程控制
if
if
1 2 3 4 5 6 7 8 9 10 11 12 13 14 15 16 17 18 19 20 21 22 23 24 25 26 27 28 29 30 31 32 33 34 35 36 if [条件判断];then 程序 fi if [条件判断]then 程序 fi if [ $1 = user1 ]then echo "welcome, $1 " fi if [ "$1 " x = "user1" x ]then echo "welcome, $1 " fi [root@Centos8 ~]# bash if01.sh user1 welcome, user1 [root@Centos8 ~]# a=33 [root@Centos8 ~]# if [ $a -gt 18 -a $a -lt 35 ]; then echo "OK" ; fi OK [root@Centos8 ~]# a=333 [root@Centos8 ~]# if [ $a -gt 18 -a $a -lt 35 ]; then echo "OK" ; fi [root@Centos8 ~]#
if…else
1
2
3
4
5
6
7
8
9
10
11
12
13
14
15
16
17
18
19
20
21
22
[root@Centos8 ~]# ./if01.sh user1 33 welcome, user1 成年人 [root@Centos8 ~]# cat -n if01.sh 1 2 3 4 if [ "$1 " x = "user1" x ] 5 then 6 echo "welcome, $1 " 7 fi 8 9 if [ $2 -gt 18 ] 10 then 11 echo "成年人" 12 else 13 echo "未成年人" 14 fi [root@Centos8 ~]# ./if01.sh user1 3 welcome, user1 未成年人 [root@Centos8 ~]#
if…elif…else
1
2
3
4
5
6
7
8
9
10
11
12
13
14
15
16
17
18
19
20
21
22
23
24
25
26
27
28
29
30
31
32
33
34
35
36
37
38
39
40
41
42
43
44
45
46
[root@Centos8 ~]# ./if01.sh user1 3 34 welcome, user1 未成年人 E [root@Centos8 ~]# ./if01.sh user1 34 134 welcome, user1 成年人 Error ! ! ! [root@Centos8 ~]# [root@Centos8 ~]# cat if01.sh if [ "$1 " x = "user1" x ]then echo "welcome, $1 " fi if [ $2 -gt 18 ]then echo "成年人" else echo "未成年人" fi if [ $3 -ge 90 -a $3 -le 100 ]then echo "A" elif [ $3 -ge 80 -a $3 -lt 90 ]then echo "B" elif [ $3 -ge 70 -a $3 -lt 80 ]then echo "C" elif [ $3 -ge 60 -a $3 -lt 70 ]then echo "D" elif [ $3 -ge 0 -a $3 -lt 60 ]then echo "E" else echo "Error ! ! !" fi [root@Centos8 ~]#
if高级语法
case
1
2
3
4
5
6
7
8
9
10
11
12
13
14
15
16
17
1. 基本语法 case $变量值 in "值1" ) 如果变量值=值1,则执行程序1 ;; "值2" ) 如果变量值=值2,则执行程序2 ;; "值3" ) 如果变量值=值3,则执行程序3 ;; ** **其他分支** *) 如果变量值都不符合以上的值,执行此程序 ;; esac
1
2
3
4
5
6
7
8
9
10
11
12
13
14
15
16
17
18
19
20
21
22
23
24
25
26
27
28
29
30
31
32
33
34
35
36
37
38
39
40
41
42
43
44
45
46
47
2. 实例 [root@Centos8 shells]# vim case01.sh [root@Centos8 shells]# chmod 744 case01.sh [root@Centos8 shells]# ./case01.sh 2 C two c [root@Centos8 shells]# ./case01.sh 2 F two other [root@Centos8 shells]# ./case01.sh 4 A other a [root@Centos8 shells]# cat case01.sh case $1 in 1) echo "one" ;; 2) echo "two" ;; 3) echo "three" ;; *) echo "other" ;; esac case $2 in "A" ) echo "a" ;; "B" ) echo "b" ;; "C" ) echo "c" ;; *) echo "other" ;; esac [root@Centos8 shells]#
for
for循环介绍
基本语法
1 2 3 4 5 6 for ((初始值;循环控制条件;变量变化))do 程序 done
1
2
3
4
5
6
7
8
9
10
11
12
13
14
[root@Centos8 shells]# ./for01.sh 100 5050 [root@Centos8 shells]# cat for01.sh for (( i=1 ; i<= $1 ; i++ ))do sum =$[ $sum + $i ]; done echo $sum [root@Centos8 shells]# ./for01.sh 1000 500500 [root@Centos8 shells]#
1
2
3
4
5
6
7
8
9
10
11
12
13
14
15
16
17
18
[root@Centos8 shells]# vim for02.sh [root@Centos8 shells]# ./for02.sh linux windows mac unix [root@Centos8 shells]# cat for02.sh for os in linux windows mac unixdo echo "$os " done [root@Centos8 shells]# [root@Centos8 shells]# for i in {1..100};do sum1=$[ $sum1 +$i ];done ;echo $sum1 5050 [root@Centos8 shells]#
$* $@区别
$* $@都表示传递给函数或脚本的所有参数。在不加引号的情况下,输出的参数都是一样的$1,$2,。加了引号之后$*表示所有的参数输出为一个整体,$@还是依旧依次输出$1,$2,
1
2
3
4
5
6
7
8
9
10
11
12
13
14
15
16
17
18
19
20
21
22
23
24
25
26
27
28
29
30
31
32
33
34
35
36
37
38
39
40
41
42
43
44
45
46
47
48
49
50
[root@Centos8 shells]# chmod 744 for03.sh [root@Centos8 shells]# ./for03.sh a b c d e =======$*======== a b c d e =======$@ ======== a b c d e =======$*======== a b c d e =======$@ ======== a b c d e [root@Centos8 shells]# cat for03.sh echo '=======$*========' for parmeter in $*do echo "$parmeter " done echo '=======$@========' for parmeter in $@ do echo "$parmeter " done echo '=======$*========' for parmeter in "$*" do echo "$parmeter " done echo '=======$@========' for parmeter in "$@ " do echo "$parmeter " done [root@Centos8 shells]#
while
while语法
1
2
3
4
while [条件判断式]do 程序 done
while实战
1
2
3
4
5
6
7
8
9
10
11
12
13
14
15
16
[root@Centos8 shells]# bash while.sh 100 5050 [root@Centos8 shells]# cat while.sh a=1 while [ $a -le $1 ]do sum =$[ $sum + $a ] a=$[$a + 1] done echo $sum [root@Centos8 shells]# bash while.sh 10 55 [root@Centos8 shells]#
while实战
util
util介绍
util语法
case介绍
case语法
特殊变量
shell函数
函数介绍
函数语法
函数应用
系统函数
date
1
2
3
4
5
6
7
8
[root@Centos8 shells]# bash cmd01.sh qwe qwe_log_1649663196 [root@Centos8 shells]# cat cmd01.sh filename="$1 " _log_$(date +%s) echo "$filename " [root@Centos8 shells]#
basename
获取当前文件名,针对最后一个”/“之后的内容
1
2
3
4
5
6
7
8
9
10
11
12
13
14
15
16
17
18
19
20
21
22
23
24
25
26
27
28
29
30
31
32
33
34
35
36
37
38
39
40
41
42
43
44
45
46
47
48
49
[root@Centos8 shells]# basename /root/shells/parmeter.sh parmeter.sh [root@Centos8 shells]# basename /root/shells/parmeter.sh .sh parmeter [root@Centos8 shells]# bash parmeter.sh a b c d =====$n ===== ScripName:parmeter.sh ScriptName: parmeter 1st parmeter: a 2ed parmeter: b =====$# ===== parmeter numbers 4 =====$*===== a b c d =====$@ ===== a b c d =====$*===== a b c d =====$@ ===== a b c d [root@Centos8 shells]# vim parmeter.sh [root@Centos8 shells]# cat parmeter.sh echo '=====$0=====' echo "ScripName:$0 " echo "ScriptName: $(basename $0 .sh) " echo "1st parmeter: $1 " echo 2ed parmeter: $2 echo '=====$#=====' echo parmeter numbers $# echo '=====$*=====' echo $*echo '=====$@=====' echo $@ echo '=====$*=====' echo "$*" echo '=====$@=====' echo "$@ " [root@Centos8 shells]#
diranaem
获取当前路径,针对最后一个”/“之前的内容
1
2
3
4
5
6
7
8
9
10
11
12
13
14
15
16
17
18
19
20
21
22
23
24
25
26
27
28
29
30
31
32
33
34
35
36
37
38
39
40
41
42
43
44
45
46
47
48
49
50
51
52
53
54
[root@Centos8 shells]# dirname /root/shells/parmeter.sh /root/shells [root@Centos8 shells]# dirname ./parmeter.sh . [root@Centos8 shells]# [root@Centos8 shells]# /root/shells/parmeter.sh a b c =====$n ===== ScripName:/root/shells/parmeter.sh ScriptName: parmeter ScriptPath: /root/shells 1st parmeter: a 2ed parmeter: b =====$# ===== parmeter numbers 3 =====$*===== a b c =====$@ ===== a b c =====$*===== a b c =====$@ ===== a b c [root@Centos8 shells]# cat parmeter.sh echo '=====$n=====' echo "ScripName:$0 " echo "$baename " echo "$dirname " echo "ScriptName: $(basename $0 .sh) " echo "ScriptPath: $(cd $(dirname $0) ; pwd)" echo "1st parmeter: $1 " echo 2ed parmeter: $2 echo '=====$#=====' echo parmeter numbers $# echo '=====$*=====' echo $*echo '=====$@=====' echo $@ echo '=====$*=====' echo "$*" echo '=====$@=====' echo "$@ " [root@Centos8 shells]#
自定义函数
1 2 3 4 5 6 7 8 9 10 11 12 13 14 15 16 17 18 19 20 21 22 23 24 25 26 27 28 29 30 31 32 33 34 35 [function ] funname[()] { Aaction [return int;] } ```sh 1. 再调用函数地方之前,先声明函数,shell脚本是逐行运行,不会像其他语言一样先编译 2. 函数返回值,只能通过$?系统变量获得,可以下显示加:return 返回,如果不加将以最后一条执行命令结果作为返回值。return 后跟数值(0-255) ```sh [root@Centos8 shells]# vim function.sh [root@Centos8 shells]# ./function.sh 请输入第一个整数:123 请输入第一个整数:321 444 和:444 [root@Centos8 shells]# cat function.sh function add s=$[$1 + $2 ] echo $s } read -p "请输入第一个整数:" aread -p "请输入第一个整数:" badd $a $b sum =$(add $a $b )echo "和:" $sum [root@Centos8 shells]#
正则表达式
正则表达式介绍
常规匹配
1
2
3
4
[root@Centos8 shells]# cat /etc/passwd | grep root root:x:0:0:root:/root:/bin/bash operator:x:11:0:operator:/root:/sbin/nologin [root@Centos8 shells]#
特殊字符
1 2 3 4 5 6 7 8 9 10 11 12 13 14 15 16 17 18 19 20 21 22 23 24 25 26 27 28 29 30 31 32 33 34 35 36 37 38 39 40 41 42 43 44 45 46 47 48 49 50 51 52 53 54 55 56 57 58 59 60 61 62 63 64 65 66 67 68 69 70 [root@Centos8 shells]# cat /etc/passwd | grep ^s sync :x:5:0:sync :/sbin:/bin/syncshutdown:x:6:0:shutdown:/sbin:/sbin/shutdown systemd-coredump:x:999:997:systemd Core Dumper:/:/sbin/nologin systemd-resolve:x:193:193:systemd Resolver:/:/sbin/nologin setroubleshoot:x:995:991::/var/lib/setroubleshoot:/sbin/nologin sssd:x:992:988:User for sssd:/:/sbin/nologin sshd:x:74:74:Privilege-separated SSH:/var/empty/sshd:/sbin/nologin [root@Centos8 shells]# cat /etc/passwd | grep ^ss sssd:x:992:988:User for sssd:/:/sbin/nologin sshd:x:74:74:Privilege-separated SSH:/var/empty/sshd:/sbin/nologin [root@Centos8 shells]# [root@Centos8 shells]# cat /etc/passwd | grep t$ halt:x:7:0:halt:/sbin:/sbin/halt [root@Centos8 shells]# [root@Centos8 shells]# cat /etc/passwd | grep r..t root:x:0:0:root:/root:/bin/bash operator:x:11:0:operator:/root:/sbin/nologin ftp:x:14:50:FTP User:/var/ftp:/sbin/nologin [root@Centos8 shells]# [root@Centos8 shells]# cat /etc/passwd | grep ro.t root:x:0:0:root:/root:/bin/bash operator:x:11:0:operator:/root:/sbin/nologin [root@Centos8 shells]# [root@Centos8 shells]# cat /etc/passwd | grep ^a.*bash$ admin:x:1000:1000::/home/admin:/bin/bash [root@Centos8 shells]# [6,8] 匹配6或8 [0-9] 匹配0-9之间任意一个数 [0-9]* 匹配任意长度的数字字符串 [a-z] 匹配a-z之间任意一个 [a-z]* 匹配任意长度的a-z的字符串 [a-c,e-f] 匹配a-c,e-f各一个组成的字符串 [root@Centos8 shells]# cat /etc/passwd | grep r[a-z]t operator:x:11:0:operator:/root:/sbin/nologin sshd:x:74:74:Privilege-separated SSH:/var/empty/sshd:/sbin/nologin rngd:x:990:986:Random Number Generator Daemon:/var/lib/rngd:/sbin/nologin [root@Centos8 shells]# cat /root/shells/tar01.sh | grep '\$' if [ $# -ne 1 ]if [ -d $1 ]DIR_NAME=$(basename $1 ) DIR_PATH=$(cd $(dirname $1 ); pwd ) DATE=$(date +%y%m%d) FILE=archive_${DIR_NAME} _$DATE .tar.gz DEST=/root/File/$FILE tar -czf $DEST $DIR_PATH /$DIR_NAME if [ $? -eq 0 ] echo '归档文件为:$DEST' [root@Centos8 shells]# cat /root/shells/tar01.sh | grep /'\$' DEST=/root/File/$FILE tar -czf $DEST $DIR_PATH /$DIR_NAME [root@Centos8 shells]#
POSIX字符
shell对文件的操作
shell对文件操作介绍
sed编辑器
sed编辑器被称作流编辑器,与普通的交互式文本编辑器截然不同。在交互式文本编辑器(比如vim)中,可以用键盘命令交互式的插入、删除或替换文本数据。流编辑器则是根据事先设计好的一组规则编辑数据流。
sed命令的格式如下
1 sed [-hnV][-e<script>][-f<script文件>][文本文件]
参数说明
-e script或–expression=script 以选项中指定的script来处理输入的文本文件。
-f script文件–file=<script文件> 以选项中指定的script文件来处理输入的文本文件。
-h或–help 显示帮助。
-n或–quiet或–silent 仅显示script处理后的结果。
-V或–version 显示版本信息。
动作说明
a :新增, a 的后面可以接字串,而这些字串会在新的一行出现(目前的下一行)~
c :取代, c 的后面可以接字串,这些字串可以取代 n1,n2 之间的行!
d :删除,因为是删除啊,所以 d 后面通常不接任何东东;
i :插入, i 的后面可以接字串,而这些字串会在新的一行出现(目前的上一行);
p :打印,亦即将某个选择的数据印出。通常 p 会与参数 sed -n 一起运行~
s :取代,可以直接进行取代的工作哩!通常这个 s 的动作可以搭配正则表达式!例如 1,20s/old/new/g 就是啦!
s 取代
使用替换(s)命令,用斜线间指定的第二个字符串“AA”替换第一个字符串“world”
1
2
3
4
5
6
7
[root@cfff3ad6bb5a shells]# pwd /home/shells [root@cfff3ad6bb5a shells]# echo "hello world" hello world [root@cfff3ad6bb5a shells]# echo "hello world" | sed 's/world/AA/' hello AA [root@cfff3ad6bb5a shells]#
使用替换(s)命令,同时对数据做多处修改
注意:sed编辑器不会修改文本文件的数据,他只是将修改后的数据发送到STDOUT,如果查看原来的文件还是原先内容
1
2
3
4
5
6
7
8
9
10
11
12
13
14
15
16
[root@cfff3ad6bb5a shells]# cat data1.txt The quick brown fox jumps over the lazy dog The quick brown fox jumps over the lazy dog The quick brown fox jumps over the lazy dog The quick brown fox jumps over the lazy dog [root@cfff3ad6bb5a shells]# sed 's/dog/cat/' data1.txt The quick brown fox jumps over the lazy cat The quick brown fox jumps over the lazy cat The quick brown fox jumps over the lazy cat The quick brown fox jumps over the lazy cat [root@cfff3ad6bb5a shells]# cat data1.txt The quick brown fox jumps over the lazy dog The quick brown fox jumps over the lazy dog The quick brown fox jumps over the lazy dog The quick brown fox jumps over the lazy dog [root@cfff3ad6bb5a shells]#
以行为单位的新增
使用新增(a)命令在指定行新增数据,文件的第2行后添加一行,并将结果输出到标准输出
1
2
3
4
5
6
7
[root@cfff3ad6bb5a shells]# sed -e 2a\test-add-new-line data1.txt The quick brown fox jumps over the lazy dog The quick brown fox jumps over the lazy dog test-add-new-line The quick brown fox jumps over the lazy dog The quick brown fox jumps over the lazy dog [root@cfff3ad6bb5a shells]#
以行为单位的删除
使用删除(d)命令删除指定行;将2至4行删除;将第2行删除
1
2
3
4
5
6
7
8
9
10
11
12
[root@cfff3ad6bb5a shells]# nl data1.txt 1 The quick brown fox jumps over the lazy dog 2 The quick brown fox jumps over the lazy dog 3 The quick brown fox jumps over the lazy dog 4 The quick brown fox jumps over the lazy dog [root@cfff3ad6bb5a shells]# nl data1.txt | sed '2,4d' 1 The quick brown fox jumps over the lazy dog [root@cfff3ad6bb5a shells]# nl data1.txt | sed '2d' 1 The quick brown fox jumps over the lazy dog 3 The quick brown fox jumps over the lazy dog 4 The quick brown fox jumps over the lazy dog [root@cfff3ad6bb5a shells]#
以行为单位的替换与显示
将2-4行替换为NO 2-4 number
1
2
3
4
5
6
7
8
9
10
[root@cfff3ad6bb5a shells]# nl data1.txt 1 The quick brown fox jumps over the lazy dog 2 The quick brown fox jumps over the lazy dog 3 The quick brown fox jumps over the lazy dog 4 The quick brown fox jumps over the lazy dog [root@cfff3ad6bb5a shells]# nl data1.txt | sed '2,4c NO 2-4 number' 1 The quick brown fox jumps over the lazy dog NO 2-4 number [root@cfff3ad6bb5a shells]#
仅列出文件第2-4行
1
2
3
4
5
[root@cfff3ad6bb5a shells]# nl data1.txt | sed -n '2,4p' 2 The quick brown fox jumps over the lazy dog 3 The quick brown fox jumps over the lazy dog 4 The quick brown fox jumps over the lazy dog [root@cfff3ad6bb5a shells]#
sed小技巧
shell对输出流的处理
cut
在文件中负责剪切数据的
基本用法
cut [选项参数] filename
选项参数
选项参数
功能
-f
列号,提取第几列
-d
分隔符,按照指定分隔符分割列,默认是制表符”\t“
-c
按字符进行分割,后加n表示去第几列,比如-c 2
实例
1 2 3 4 5 6 7 8 9 10 11 12 13 14 15 16 17 18 19 20 21 22 23 24 25 26 27 28 29 30 31 32 33 34 35 36 37 38 39 40 41 42 43 44 45 [root@Centos8 shells]# cat cut01.sh dong shen guan zhen lai lai le le [root@Centos8 shells]# [root@Centos8 shells]# cut -d " " -f 1 cut01.sh dong guan lai le [root@Centos8 shells]# [root@Centos8 shells]# cut -d " " -f 2,3 cut01.sh 文本处理工具 cut shen zhen lai le [root@Centos8 shells]# cat /etc/passwd | grep bash$ root:x:0:0:root:/root:/bin/bash admin:x:1000:1000::/home/admin:/bin/bash [root@Centos8 shells]# cat /etc/passwd | grep bash$ | cut -d ":" -f 1,6,7 root:/root:/bin/bash admin:/home/admin:/bin/bash [root@Centos8 shells]# cat /etc/passwd | grep bash$ | cut -d ":" -f 1,5- root:root:/root:/bin/bash admin::/home/admin:/bin/bash [root@Centos8 shells]# [root@Centos8 shells]# ifconfig eth0 | grep netmask inet 172.17.9.131 netmask 255.255.192.0 broadcast 172.17.63.255 [root@Centos8 shells]# ifconfig eth0 | grep netmask | cut -d " " -f 10 172.17.9.131 [root@Centos8 shells]#
awk
强大的文本分析工具,吧文件逐行读入,以空格为默认分隔符将每行切片,切开的部分再进行处理,awk本质上就是gawk
1
2
3
4
5
6
[root@Centos8 shells]# which awk /usr/bin/awk [root@Centos8 shells]# ll /usr/bin | grep awk lrwxrwxrwx. 1 root root 4 5月 11 2019 awk -> gawk -rwxr-xr-x. 1 root root 698520 5月 11 2019 gawk [root@Centos8 shells]#
基本用法
awk [选项参数] ‘/pattern1/{action1} /pattern2{action2}…’ filenaem
pattern:表示 awk在数据中查找的内容就是匹配模式
action:在找到匹配内容时所执行的一系列命令
选项参数
-F 指定输入文件分隔符
实例
1 2 3 4 5 6 7 8 9 10 11 12 13 14 15 16 17 18 19 20 21 22 23 24 25 26 27 28 29 30 31 32 33 34 35 36 37 38 39 40 41 42 43 44 45 46 47 48 49 50 51 52 53 54 55 56 57 58 59 60 61 [root@Centos8 shells]# cp /etc/passwd passwd [root@Centos8 shells]# ll -rw-r--r-- 1 root root 1582 4月 12 11:08 passwd1 [root@Centos8 shells]# [root@Centos8 shells]# cat passwd | awk -F ":" '/^root/ {print $7}' /bin/bash [root@Centos8 shells]# cat passwd | awk -F ":" '/^root/ {print $1}' root [root@Centos8 shells]# cat passwd | awk -F ":" '/^root/ {print $1 $7}' root/bin/bash [root@Centos8 shells]# [root@Centos8 shells]# cat passwd | grep ^root | cut -d ":" -f 1,7 root:/bin/bash [root@Centos8 shells]# [root@Centos8 shells]# cat passwd | awk -F ":" '/^root/ {print $1","$7}' root,/bin/bash [root@Centos8 shells]# [root@Centos8 shells]# cat passwd | awk -F ":" 'BEGIN{print "user,shell"}/^s/{print $1","$7} END{print "end of file!"}' user,shell sync ,/bin/syncshutdown,/sbin/shutdown systemd-coredump,/sbin/nologin systemd-resolve,/sbin/nologin setroubleshoot,/sbin/nologin sssd,/sbin/nologin sshd,/sbin/nologin end of file! [root@Centos8 shells]# awk -F ":" 'BEGIN{print "Begin of File!"}/down$/{print $1"-"$7} END{print "End of File!"}' passwd Begin of File! shutdown-/sbin/shutdown End of File! [root@Centos8 shells]# [root@Centos8 shells]# cat passwd | awk -F ":" '{print $3}' 0 1 2 3 [root@Centos8 shells]# cat passwd | awk -F ":" '{print $3+1}' 1 2 3 4 [root@Centos8 shells]# cat passwd | awk -F ":" -v i=2 '{print $3+i}' 2 3 4 5 [root@Centos8 shells]#
awk内置变量
FILENAME 文件名
1
2
3
4
5
6
7
8
9
10
11
12
13
14
15
16
17
18
19
20
21
22
23
24
25
26
27
28
29
30
31
32
33
34
35
36
37
38
39
40
41
42
43
44
45
46
47
48
49
50
[root@Centos8 shells]# awk -F ":" '{print "FileName: "FILENAME " 行号:"NR " 列数:"NF}' passwd FileName: passwd 行号:1 列数:7 FileName: passwd 行号:2 列数:7 FileName: passwd 行号:3 列数:7 FileName: passwd 行号:4 列数:7 FileName: passwd 行号:5 列数:7 FileName: passwd 行号:6 列数:7 FileName: passwd 行号:7 列数:7 FileName: passwd 行号:8 列数:7 FileName: passwd 行号:9 列数:7 FileName: passwd 行号:10 列数:7 FileName: passwd 行号:11 列数:7 FileName: passwd 行号:12 列数:7 FileName: passwd 行号:13 列数:7 FileName: passwd 行号:14 列数:7 FileName: passwd 行号:15 列数:7 FileName: passwd 行号:16 列数:7 FileName: passwd 行号:17 列数:7 FileName: passwd 行号:18 列数:7 FileName: passwd 行号:19 列数:7 FileName: passwd 行号:20 列数:7 FileName: passwd 行号:21 列数:7 FileName: passwd 行号:22 列数:7 FileName: passwd 行号:23 列数:7 FileName: passwd 行号:24 列数:7 FileName: passwd 行号:25 列数:7 FileName: passwd 行号:26 列数:7 FileName: passwd 行号:27 列数:7 FileName: passwd 行号:28 列数:7 FileName: passwd 行号:29 列数:7 FileName: passwd 行号:30 列数:7 [root@Centos8 shells]# [root@Centos8 shells]# ifconfig | awk '/^$/{print "行号:" NR}' 行号:9 行号:18 [root@Centos8 shells]# [root@Centos8 shells]# ifconfig | grep -n ^$ | cut -f 1 -d ":" 9 18 [root@Centos8 shells]# ifconfig | grep -n ^$ 9: 18: [root@Centos8 shells]# [root@Centos8 shells]# ifconfig eth0 | awk '/netmask/{print $2}' 172.17.9.131 [root@Centos8 shells]#
Shell案例
归档文件
实际生产中往往需要对重要数据进行归档备份
1 2 3 4 5 6 7 8 9 10 11 12 13 14 15 16 17 18 19 20 21 22 23 24 25 26 27 28 29 30 31 32 33 34 35 36 37 38 39 40 41 42 43 44 45 46 47 48 49 50 51 52 53 54 55 56 57 58 [root@Centos8 shells]# [root@Centos8 shells]# crontab -l no crontab for root [root@Centos8 shells]# crontab -e [root@Centos8 shells]# crontab -l 55 18 * * * /root/shells/tar01.sh /root/shells [root@Centos8 shells]# [root@Centos8 shells]# cat tar01.sh if [ $# -ne 1 ]then echo "参数不唯一!请输入一个归档目录名:" exit fi if [ -d $1 ]then echo else echo "目录不存在!" fi DIR_NAME=$(basename $1 ) DIR_PATH=$(cd $(dirname $1 ); pwd ) DATE=$(date +%y%m%d) FILE=archive_${DIR_NAME} _$DATE .tar.gz DEST=/root/backup/File/$FILE echo '开始归档。。。' echo tar -czf $DEST $DIR_PATH /$DIR_NAME if [ $? -eq 0 ]then echo echo '归档成功!' echo '归档文件为:' $DEST echo else echo '归档出现问题!!!' echo fi exit [root@Centos8 shells]#
删除前一天的归档文件
1
2
3
4
5
6
7
8
9
10
11
12
13
14
15
16
17
18
19
20
21
22
23
24
25
26
27
28
29
30
31
32
33
#!/bin/bash if [ $# -ne 2 ]then echo "Args error! Please input 2 args: " exit fi if [ -d $1 ]then echo else echo "1st arg is not a directory!" fi TOTAL=$(ls -l $1 |grep ^-|wc -l) if [ $TOTAL -ne $2 ];then echo "The number of backup file is error!" exit else echo fi NOW_DATE=$(date +%y%m%d) BEF_DATE=$((NOW_DATE-1 )) find $1 -type f -name "*$BEF_DATE *" -delete
正则匹配手机号
1
2
3
4
5
6
7
8
9
10
[root@Centos8 shells]# echo "13212345678" | grep ^1[356789][0-9][0-9][0-9][0-9][0-9][0-9][0-7][0-9][0-9]$ 13212345678 [root@Centos8 shells]# echo "15212345678" | grep ^1[356789][0-9][0-9][0-9][0-9][0-9][0-9][0-7][0-9][0-9]$ 15212345678 [root@Centos8 shells]# echo "11212345678" | grep ^1[356789][0-9][0-9][0-9][0-9][0-9][0-9][0-7][0-9][0-9]$ [root@Centos8 shells]# [root@Centos8 shells]# echo "15212345678" | grep -E ^1[356789][0-9]{9} 15212345678 [root@Centos8 shells]#
发送消息
利用Linux的mesg和write向其他用户发送消息
1 2 3 4 5 6 7 8 9 10 11 12 13 14 15 16 17 18 19 20 21 22 23 24 25 26 27 28 29 30 31 32 33 34 35 36 37 38 39 40 41 42 43 44 45 46 47 48 49 50 51 52 53 54 55 56 57 58 59 60 61 62 63 64 65 66 67 68 69 70 71 72 [root@Centos8 ~]# mesg n [root@Centos8 ~]# mesg 是 n [root@Centos8 ~]# mesg n [root@Centos8 ~]# who -T root - pts/0 2022-04-12 16:27 (45.116.153.139) admin + pts/1 2022-04-12 16:58 (45.116.153.139) [root@Centos8 ~]# mesg 是 n [root@Centos8 ~]# who -T root - pts/0 2022-04-12 16:27 (45.116.153.139) admin + pts/1 2022-04-12 16:58 (45.116.153.139) [root@Centos8 ~]# mesg y [root@Centos8 ~]# who -T root + pts/0 2022-04-12 16:27 (45.116.153.139) admin + pts/1 2022-04-12 16:58 (45.116.153.139) [root@Centos8 ~]# [root@Centos8 ~]# cat /root/shells/send_message.sh LOGIN_USER=$(who | grep -i -m 1 $1 | awk '{print $1}' ) if [ -z $LOGIN_USER ]then echo "$1 不在线!!!" echo "脚本退出。。。" exit fi IS_ALLOWED=$(who -T | grep -i -m 1 $1 | awk '{print $2}' ) if [ "+" != $IS_ALLOWED ]then echo "$1 没有开启消息功能!!!" echo "脚本退出。。。" exit fi if [ -z $2 ]then echo "没有消息发送!!!" echo "脚本退出!!" exit fi MESSAGE=$(echo $* | cut -d " " -f 2-) USER_TERMINAL=$(who | grep -i -m 1 $1 | awk '{print $2}' ) echo $MESSAGE | write $LOGIN_USER $USER_TERMINAL if [ $? -ne 0 ]then echo "发送成功!" else echo "发送失败!" fi exit [root@Centos8 ~]#
计算程序消耗时间并自动输出日志到指定目录
1
2
3
4
5
6
7
8
9
10
11
12
13
14
15
16
17
18
19
20
21
22
23
24
25
26
27
28
29
30
31
32
33
34
35
36
37
38
#!/bin/bash echo "================================================================================" echo "================================== Strat Test ==================================" echo "================================================================================" len=${#string[0]} name=$0 exec_name=${name:0:len-3} result_name="$exec_name -$1 .log" touch "./results/${result_name:2} " abs_path=`pwd `"/results" start_ime=`date +%Y%m%d-%H:%M:%S` start_time_s=`date +%s` docker search $1 | tee ./results/${result_name:2} end_time=`date +%Y%m%d-%H:%M:%S` end_time_s=`date +%s` total_tiime=$[ $end_time_s - $start_time_s ] echo "================================================================================" echo "=================================== End Test =================================" echo "================================================================================" echo "$start_ime ---> $end_time " echo "Total:$total_tiime seconds" echo "The results are saved in " ${abs_path} ${result_name:1} echo "================================================================================"
在程序运行前和运行后输出时间
1
2
3
4
5
6
7
8
9
10
11
12
13
14
15
echo start: `date `for ((i=1 ;i<=10 ;i++))do echo "The next number is $i " pwd sleep 1 ls sleep 1 pwd echo $(date +'%Y-%m-%d %H:%M:%S' ) done echo end: `date `
为当前目录下的文件包括子文件夹更改权限
1
2
3
4
5
6
7
8
9
10
11
12
13
14
15
16
17
18
19
20
21
#!/bin/bash sudo chmod -Rc 777 $1 /*
从当前目录下复制文件并重命名
1
2
#!/bin/bash sudo cp ./a-script-demo.sh ./test$1 .sh
从源文件夹复制到目录文件中
删除指定文件夹下同一后缀的所有文件
1 2 3 #!/bin/bash find $1 -name/ "*.out" -delete
Shell 实战
cron 定时任务配置
1 2 3 4 5 6 7 8 9 10 11 12 13 14 15 16 17 18 19 20 21 22 23 24 25 # docker conainers stop and start 0 1 * * * /data/shell/docker_stop.sh vscode-server 0 7 * * * /data/shell/docker_start.sh vscode-server # Periodic delete file 40 12,23 * * * /data/shell/tar_delete.sh /root/backup/File /data # Periodic backup file 30 12,23 * * * /data/shell/tar_delete.sh /root/backup/File /data # delete all file like *.out from /data/docker/vscode-server/C/Posix 30 6-23 * * * /data/shell/delete_suf.sh /data/docker/vscode-server # chmod 777 for /data0 */4 * * * /data/shell/chmod_permission.sh /data/docker # update auth to ubuntu 0 3 * * * /data/shell/update_ubuntu_auth.sh # sync file from source dir to target dir 25 6-23 * * * /data/shell/sync_files.sh /data/docker/vscode-server/Hexo/HexoGithub/source/_posts/ data/docker/vscode-server/Hexo/ldspdvsun.gitlab.io/source/_posts/ # sync local and remote repo55 6-23 * * * /data/shell/sync_local_remote_repo.sh /data/docker/vscode-server/Hexo/HexoGithub/ 55 6-23 * * * /data/shell/sync_local_remote_repo.sh /data/docker/vscode-server/Hexo/ldspdvsun.gitlab.io/
容器定时关闭与启动
1 2 3 4 5 6 7 8 9 10 root@10-7-153-197:/data/shell# cat docker_stop.sh # !/bin/bash docker stop $1 root@10-7-153-197:/data/shell# cat docker_start.sh # !/bin/bash docker start $1 root@10-7-153-197:/data/shell#
定时备份与删除文件
1 2 3 4 5 6 7 8 9 10 11 12 13 14 15 16 17 18 19 20 21 22 23 24 25 26 27 root@10-7-153-197:/data/shell# cat tar_delete.sh # !/bin/bash # 设置备份目录 backup_dir=$1 # 获取当前日期和时间 now=$(date +"%Y-%m-%d_%H-%M-%S") # 备份文件 if [ $(date +%H) -eq 23 ] && [ $(date +%M) -eq 30 ]; then tar -czvf "${backup_dir}/backup_${now}.tar.gz" $2 elif [ $(date +%H) -eq 12 ] && [ $(date +%M) -eq 30 ]; then tar -czvf "${backup_dir}/backup_${now}.tar.gz" $2 fi # 删除文件 if [ $(date +%H) -eq 12 ] && [ $(date +%M) -eq 40 ]; then # 删除前一天23点的备份 last_day=$(date -d "yesterday" +"%Y-%m-%d") rm "${backup_dir}/backup_${last_day}_23"*".tar.gz" elif [ $(date +%H) -eq 23 ] && [ $(date +%M) -eq 40 ]; then # 删除当天12点的备份 rm "${backup_dir}/backup_${now:0:10}_12"*".tar.gz" fi root@10-7-153-197:/data/shell#
删除指定后缀文件
1
2
3
4
5
6
7
8
9
10
root@10-7-153-197:/data/shell# cat delete_suf.sh # !/bin/bash # delete all file like *.out sudo find $1/ -name "*.out" -delete sudo find $1/ -name "*.o" -delete sudo find $1/ -name "*.log" -delete sudo find "$1" -type d -name ".pytest_cache" -exec rm -rf {} + sudo find "$1" -type d -name "__pycache__" -exec rm -rf {} + sudo find "$1" -type d -name ".mypy_cache" -exec rm -rf {} + root@10-7-153-197:/data/shell#
修改指定文件权限
1 2 3 root@10-7-153-197:/data/shell# cat chmod_permission.sh # !/bin/bash sudo chmod -R 777 $1/*
更改 Ubuntu 下 Nginx 认证权限
1 2 3 4 5 6 7 8 9 10 11 12 13 14 15 16 17 18 19 20 21 22 23 24 25 26 27 28 root@10-7-153-197:/data/shell# cat update_ubuntu_auth.sh # !/bin/bash # Step 1: Get current date with a prefix current_date=$(date +'%m%d') prefix="Author@" prefixed_date="${prefix}${current_date}" # Step 2: Write the prefixed date to password.txt echo "$prefixed_date" > password.txt # Step 3: Generate password and update .htpasswd file if sudo htpasswd -b -c /etc/nginx/.htpasswd Author "$prefixed_date"; then echo "Password updated successfully." else echo "Password update failed." exit 1 fi # Step 4: Restart Nginx if sudo systemctl restart nginx; then echo "Nginx restarted successfully." else echo "Nginx restart failed." exit 1 fi root@10-7-153-197:/data/shell#
同步本地文件夹与目标文件夹
1 2 3 4 5 6 7 8 9 10 11 12 13 14 15 16 17 18 19 20 21 22 23 24 25 26 27 28 29 30 31 32 33 34 35 36 37 38 39 40 41 42 43 44 45 46 47 root@10-7-153-197:/data/shell# cat sync_files.sh # !/bin/bash # 检查参数数量 if [ "$#" -ne 2 ]; then echo "Usage: ./sync_files.sh SOURCE_DIR TARGET_DIR" exit 1 fi # 获取命令行参数 SOURCE_DIR="$1" TARGET_DIR="$2" # 确保目标目录存在 mkdir -p "$TARGET_DIR" # 查找第一个目录下的所有文件 find "$SOURCE_DIR" -type f | while read -r file do # 获取相对于 $SOURCE_DIR 的文件路径 relative_path=${file#$SOURCE_DIR} # 去掉路径前的'/' 符号 relative_path=${relative_path#/} # 定义在第二个目录中的文件路径 target_file="$TARGET_DIR/$relative_path" # 确保目标文件所在的目录存在 mkdir -p "$(dirname "$target_file")" # 检查文件在第二个目录中是否存在 if [ -f "$target_file" ]; then # 比较文件内容 if ! diff -q "$file" "$target_file" > /dev/null 2>&1; then echo "文件不一致,复制: $file -> $target_file" cp "$file" "$target_file" else echo "文件一致: $file -> $target_file" fi else echo "目标不存在,复制新文件: $file -> $target_file" cp "$file" "$target_file" fi done root@10-7-153-197:/data/shell#
同步本地与远程仓库
1 2 3 4 5 6 7 8 9 10 11 12 13 14 15 16 17 18 19 20 21 22 23 24 25 26 27 28 29 30 31 32 33 34 35 36 37 38 39 40 41 42 43 44 45 46 47 48 49 50 root@10-7-153-197:/data/shell# cat sync_local_remote_repo.sh # !/bin/bash # 检查参数数量 if [ "$#" -ne 1 ]; then echo "Usage: $0 REPO_DIR" exit 1 fi # 获取命令行参数 REPO_DIR="$1" # 检查指定目录是否是Git仓库 if [ ! -d "$REPO_DIR/.git" ]; then echo "The specified directory is not a Git repository." exit 1 fi # 进入指定的Git仓库目录 cd "$REPO_DIR" || exit # 检查工作目录中的变化 changes=$(git status --porcelain) # 如果没有变化,退出 if [ -z "$changes" ]; then echo "No changes detected." exit 0 fi # 获取变化的文件名 changed_files=$(echo "$changes" | awk '{print $2}') # 输出变化的文件 echo "Changes detected in the following files:" echo "$changed_files" # 添加所有变化 git add . # 提交变化,以变化的文件名作为提交信息 commit_message=$(echo "$changed_files" | tr '\n' ' ') git commit -m "$commit_message" # 推送到远程仓库 git push origin main echo "Changes committed and pushed to the repository." root@10-7-153-197:/data/shell#
标准化编译 C 项目及 C 文件
1 2 3 4 5 6 7 8 9 10 11 12 13 14 15 16 17 18 19 20 21 22 23 24 25 26 27 28 29 30 31 32 33 34 35 36 37 38 39 40 41 42 43 44 45 46 47 48 49 50 51 52 53 54 55 56 57 58 59 60 61 62 63 64 65 66 67 68 69 70 71 72 73 74 75 76 77 78 79 80 81 82 83 84 85 86 87 88 89 90 91 92 93 94 95 96 97 98 99 100 101 102 103 104 105 106 107 108 109 110 111 112 113 114 115 116 117 118 119 120 121 122 123 124 125 126 127 128 129 130 131 132 133 134 135 136 137 138 139 140 141 142 143 144 145 146 147 148 149 150 151 152 153 154 155 156 157 158 159 160 161 162 163 164 165 166 167 168 169 170 171 172 173 174 175 176 177 178 179 180 181 182 183 184 185 186 187 188 189 190 191 192 193 194 195 196 197 198 199 200 root@10-7-153-197:/data/shell# cat sunmy_c_build.sh # !/bin/bash # --- 配置变量 --- CC="gcc" CFLAGS="-Wall -O2" LDFLAGS="-lpthread -lrt -lgcc" SYMBOLS=70 # 分隔线符号数量 OBJS_DIR_NAME="objs" # 统一对象文件目录名 # --- 函数定义 --- help() { echo -n $(seq 1 $SYMBOLS | xargs -I {} printf '=') echo -e "\n\033[1m\t\t\t C 项目构建脚本帮助\033[0m" echo -e "用法: \033[35m$0 [命令] [参数]\033[0m 或 \033[35m $0 [项目目录] [命令]\033[0m" echo -e "\033[33m支持设置环境变量 GCC 指定编译器路径 (如: GCC=/usr/bin/gcc)\033[0m" echo -n $(seq 1 $SYMBOLS | xargs -I {} printf '-') echo -e "\n\033[32m命令列表:\033[0m" echo " [需要项目目录的命令]" echo " all - 编译项目并生成可执行文件到项目目录/all_results" echo " clean - 清理项目构建产物 (对象文件/可执行文件)" echo " debug - 以调试模式编译 (添加 -DDEBUG 标志)" echo " run - 编译并运行项目" echo " valgrind - 使用 Valgrind 运行项目" echo " install - 安装可执行文件到 /usr/local/bin" echo " uninstall - 从 /usr/local/bin 卸载" echo " [独立命令]" echo " s <源文件> - 编译并运行单个 C 文件 (示例: $0 s test.c)" echo " sv <源文件> - 用 Valgrind 调试单个 C 文件" echo " h - 显示此帮助信息" echo -n $(seq 1 $SYMBOLS | xargs -I {} printf '=') echo -e "\n\033[33m示例:\033[0m" echo " # 编译运行项目:" echo " $0 /path/to/project run" echo " # 调试单个文件:" echo " $0 sv test.c" echo -n $(seq 1 $SYMBOLS | xargs -I {} printf '=') echo exit 0 } setup_project() { PROJECT_DIR="$1" if [ ! -d "$PROJECT_DIR" ]; then echo -e "\033[31m错误: 项目目录不存在 '$PROJECT_DIR'\033[0m" exit 1 fi # 初始化项目相关路径 TARGET="$PROJECT_DIR/all_results" DIR_SRC="$PROJECT_DIR/src" DIR_INCLUDE="$PROJECT_DIR/include" OBJS_DIR="$PROJECT_DIR/$OBJS_DIR_NAME" # 搜索源文件 (最多搜索4层子目录) if [ -d "$DIR_SRC" ]; then DIRS=$(find "$DIR_SRC" -maxdepth 4 -type d) SRCS_C=$(for dir in $DIRS; do find "$dir" -maxdepth 1 -name "*.c"; done) OBJS_C=$(echo "$SRCS_C" | sed "s|$DIR_SRC/|$OBJS_DIR/|g" | sed "s|.c|.o|g") else echo -e "\033[33m警告: 项目目录中未找到 src 文件夹\033[0m" fi } compile_project() { echo -e "\033[36m[编译] 生成对象文件到 $OBJS_DIR\033[0m" mkdir -p "$OBJS_DIR" for src in $SRCS_C; do obj="$OBJS_DIR/$(basename $src .c).o" echo "编译: $src → $obj" $CC $CFLAGS -I "$DIR_INCLUDE" -c "$src" -o "$obj" || exit 1 done } link_project() { echo -e "\033[36m[链接] 生成可执行文件: $TARGET\033[0m" $CC $CFLAGS -o "$TARGET" $OBJS_C $LDFLAGS || exit 1 echo -e "\033[32m构建成功!使用 'file $TARGET' 查看详细信息\033[0m" } # --- 项目相关命令 --- cmd_all() { compile_project link_project } cmd_clean() { echo -e "\033[31m清理: 删除 $OBJS_DIR 和 $TARGET\033[0m" rm -rf "$OBJS_DIR" "$TARGET" } cmd_debug() { CFLAGS="$CFLAGS -DDEBUG -g" cmd_all } cmd_run() { cmd_all echo -e "\n\033[36m[运行] $TARGET\033[0m" "$TARGET" } cmd_valgrind() { cmd_all echo -e "\n\033[36m[Valgrind] 检测内存泄漏\033[0m" valgrind --leak-check=full --show-leak-kinds=all --track-origins=yes "$TARGET" } cmd_install() { cmd_all local install_path="/usr/local/bin/$(basename $TARGET)" echo -e "\033[36m[安装] 复制到 $install_path\033[0m" sudo cp "$TARGET" "$install_path" } cmd_uninstall() { local install_path="/usr/local/bin/$(basename $TARGET)" echo -e "\033[31m[卸载] 移除 $install_path\033[0m" sudo rm -f "$install_path" } # --- 独立命令 --- cmd_single() { local src="$1" if [ -z "$src" ]; then echo -e "\033[31m错误: 请指定源文件 (示例: $0 s test.c)\033[0m" exit 1 fi if [ ! -f "$src" ]; then echo -e "\033[31m错误: 文件不存在 '$src'\033[0m" exit 1 fi local out="$(basename $src .c).out" echo -e "\033[36m[编译] $src → $out\033[0m" $CC $CFLAGS "$src" -o "$out" || exit 1 echo -e "\033[32m[运行] 执行 $out\033[0m" ./"$out" rm -f "$out" } cmd_valgrind_single() { local src="$1" if [ -z "$src" ]; then echo -e "\033[31m错误: 请指定源文件 (示例: $0 sv test.c)\033[0m" exit 1 fi local out="$(basename $src .c).out" echo -e "\033[36m[编译] $src → $out\033[0m" $CC $CFLAGS "$src" -o "$out" || exit 1 echo -e "\033[32m[Valgrind] 检测内存泄漏\033[0m" valgrind --leak-check=full --show-leak-kinds=all --track-origins=yes ./"$out" rm -f "$out" } # --- 主逻辑 --- main() { # 处理帮助命令 if [ "$1" = "h" ] || [ "$1" = "-h" ] || [ "$1" = "--help" ]; then help fi # 解析命令模式 case "$1" in s|sv|h) # 独立命令 command="$1" shift case "$command" in s) cmd_single "$@" ;; sv) cmd_valgrind_single "$@" ;; h) help ;; esac ;; *) # 项目命令 if [ $# -lt 2 ]; then echo -e "\033[31m错误: 需要项目目录和命令 (使用 -h 查看帮助)\033[0m" exit 1 fi PROJECT_DIR="$1" command="$2" shift 2 setup_project "$PROJECT_DIR" case "$command" in all) cmd_all ;; clean) cmd_clean ;; debug) cmd_debug ;; run) cmd_run ;; valgrind) cmd_valgrind ;; install) cmd_install ;; uninstall) cmd_uninstall ;; *) echo -e "\033[31m错误: 未知命令 '$command'\033[0m"; help ;; esac ;; esac } # --- 执行主函数 --- main "$@"
采集Linux系统基本信息
1 2 3 4 5 6 7 8 9 10 11 12 13 14 15 16 17 18 19 20 21 22 23 24 25 26 27 28 29 30 31 32 33 34 35 36 37 38 39 40 41 42 43 44 45 46 47 48 49 50 51 52 53 54 55 56 57 58 59 60 61 62 63 64 65 66 67 68 69 70 71 72 73 74 75 76 77 78 79 80 81 82 83 84 85 86 87 88 89 90 91 92 93 94 95 96 97 98 99 100 101 102 103 104 105 106 107 108 109 110 111 112 113 114 115 116 117 118 119 120 121 122 123 124 125 126 127 128 129 130 131 132 133 134 135 136 137 138 139 140 141 142 143 144 145 146 147 148 149 150 151 152 153 154 155 156 157 158 159 160 161 162 163 164 165 166 167 168 169 170 171 172 173 174 175 176 177 178 179 180 181 182 183 184 185 186 187 188 189 190 191 192 193 194 195 196 197 198 199 200 201 202 203 204 205 206 207 208 209 210 211 212 213 214 215 216 217 218 219 220 221 222 223 224 225 226 227 228 229 230 231 232 233 234 235 236 237 238 239 240 241 242 243 244 245 246 247 248 249 250 251 252 253 254 255 256 257 258 259 260 261 262 263 264 265 266 267 268 269 270 271 272 273 274 275 276 277 278 279 280 281 282 283 284 285 286 287 288 289 290 291 292 293 294 295 296 297 298 299 300 301 302 303 304 305 306 307 308 309 310 311 312 313 314 315 316 317 318 319 320 321 322 323 324 325 326 327 328 329 330 331 332 333 334 335 336 337 338 339 340 341 342 343 344 345 346 347 348 349 350 351 352 353 354 355 356 357 358 359 360 361 362 363 364 365 366 367 368 369 370 371 372 373 374 375 376 377 378 379 380 381 382 383 384 385 386 387 388 389 390 391 392 393 394 395 396 397 398 399 400 401 402 403 404 405 406 407 408 409 410 411 412 413 414 415 416 417 418 419 420 421 422 423 424 425 426 427 428 429 430 431 432 433 434 435 436 437 438 439 440 441 442 443 444 445 446 447 448 449 450 451 452 453 454 455 456 457 458 459 # !/bin/bash # 系统信息收集脚本 v1.0 # 功能:同时生成详细版和精简版系统信息报告 # 检查root权限 check_root(){ [ "$EUID" -ne 0 ] && { echo -e "\033[31m请使用root或sudo运行此脚本\033[0m" exit 1 } } # 全局变量 LINE1='================================================================================' LINE2='--------------------------------------------------------------------------------' BASE_NAME="SystemInfo-$(date +"%Y%m%d_%H%M%S")-$(hostname -s)" FULL_FILE="${BASE_NAME}-full.txt" SIMPLE_FILE="${BASE_NAME}-simple.txt" PACKAGES_FILE="${BASE_NAME}-packages.txt" BLUE='\033[34m' ORANGE='\033[33m' GREEN='\033[32m' RESET='\033[0m' # 初始化输出文件 init_files(){ # 创建空文件 > "$FULL_FILE" > "$SIMPLE_FILE" > "$PACKAGES_FILE" # 写入文件头 for file in "$FULL_FILE" "$SIMPLE_FILE"; do echo -e "$LINE1" >> "$file" echo -e "$LINE2" >> "$file" if [[ "$file" == "$FULL_FILE" ]]; then echo -e "\t\t\t\t\t\t系统信息收集报告 - 完整版 By Sunmy" >> "$file" else echo -e "\t\t\t\t\t\t系统信息收集报告 - 精简版 By Sunmy" >> "$file" fi echo -e "\t\t\t\t\t\t版本: v1.0" >> "$file" echo -e "\t\t\t\t\t\t生成时间: $(date "+%Y-%m-%d %H:%M:%S")" >> "$file" echo -e "\t\t\t\t\t\t主机名: $(hostname)" >> "$file" echo -e "$LINE2" >> "$file" echo -e "$LINE1" >> "$file" done } # 输出控制函数 output(){ local type=$1 shift local content="$*" case "$type" in "full") echo -e "$content" >> "$FULL_FILE" ;; "simple") echo -e "$content" >> "$SIMPLE_FILE" ;; "package") echo -e "$content" >> "$PACKAGES_FILE" ;; "both") echo -e "$content" | tee -a "$FULL_FILE" >/dev/null echo -e "$content" >> "$SIMPLE_FILE" ;; "display") echo -e "$content" ;; esac } # ---------------------------------------------- # 信息收集模块 # ---------------------------------------------- show_os_full(){ # 完整版 output "full" "" output "full" "" output "full" "$LINE1" output "full" "\t\t\t\t\t\t\t\t[操作系统信息]" output "full" "$LINE2" output "full" "\n# 内核版本:" output "full" "$ uname -a" uname -a >> "$FULL_FILE" output "full" "" output "full" "$ cat /proc/version" cat /proc/version >> "$FULL_FILE" output "full" "\n# 内核参数:" output "full" "$ cat /proc/cmdline" cat /proc/cmdline >> "$FULL_FILE" output "full" "\n# 系统运行时间:" output "full" "$ uptime" uptime >> "$FULL_FILE" output "full" "\n# 查看发行版详细信息:" output '$ cat /etc/os-release' cat /etc/os-release >> "$FULL_FILE" output "full" "" output "full" '$ lsb_release -a' lsb_release -a >> "$FULL_FILE" output "full" "$LINE2" output "full" "$LINE1" } show_os_simple(){ # 精简版 output "simple" "" output "simple" "" output "simple" "$LINE1" output "simple" "\t\t\t\t\t\t\t\t[操作系统信息]" output "simple" "$LINE2" output "simple" "\n# 内核版本:" output "simple" "$ uname -srmo" uname -srmo >> "$SIMPLE_FILE" output "simple" "" output "simple" "$ cat /proc/version" cat /proc/version >> "$SIMPLE_FILE" output "simple" "\n# 内核参数:" output "simple" "$ cat /proc/cmdline" cat /proc/cmdline >> "$SIMPLE_FILE" output "simple" "\n# 系统运行时间:" output "simple" "$ uptime -p" uptime -p >> "$SIMPLE_FILE" output "simple" "\n# 查看发行版详细信息:" output "simple" '$ cat /etc/os-release' cat /etc/os-release >> "$SIMPLE_FILE" output "simple" "" output "simple" '$ lsb_release -a' lsb_release -a >> "$SIMPLE_FILE" output "simple" "$LINE2" output "simple" "$LINE1" } show_cpu_full(){ # 完整版 output "full" "" output "full" "" output "full" "$LINE1" output "full" "\t\t\t\t\t\t\t\t[CPU信息]" output "full" "$LINE2" output "full" "\n# lscpu输出:" output "full" "$ lscpu" lscpu >> "$FULL_FILE" output "full" "\n# CPU详细信息:" output "full" "$ cat /proc/cpuinfo" cat /proc/cpuinfo >> "$FULL_FILE" output "full" "$LINE2" output "full" "$LINE1" } show_cpu_simple(){ # 精简版 output "simple" "" output "simple" "" output "simple" "$LINE1" output "simple" "\t\t\t\t\t\t\t\t[CPU信息]" output "simple" "$LINE2" output "simple" "\n# CPU型号:" output "simple" "$ cat /proc/cpuinfo | grep 'model name' | uniq" cat /proc/cpuinfo | grep 'model name' | uniq >> "$SIMPLE_FILE" output "simple" "\n# 物理CPU数量:" output "simple" "$ cat /proc/cpuinfo | grep 'physical id' | sort | uniq | wc -l" cat /proc/cpuinfo | grep 'physical id' | sort | uniq | wc -l >> "$SIMPLE_FILE" output "simple" "\n# CPU核心数:" output "simple" "$ cat /proc/cpuinfo | grep 'cpu cores' | uniq" cat /proc/cpuinfo | grep 'cpu cores' | uniq >> "$SIMPLE_FILE" output "simple" "$LINE2" output "simple" "$LINE1" } show_memory_full(){ # 完整版 output "full" "" output "full" "" output "full" "$LINE1" output "full" "\t\t\t\t\t\t\t\t[内存信息]" output "full" "$LINE2" output "full" "\n# 完整内存信息:" output "full" "$ cat /proc/meminfo" cat /proc/meminfo >> "$FULL_FILE" output "full" "" output "full" "$ free -h" free -h >> "$FULL_FILE" output "full" "$LINE2" output "full" "$LINE1" } show_memory_simple(){ # 精简版 output "simple" "" output "simple" "" output "simple" "$LINE1" output "simple" "\t\t\t\t\t\t\t\t[内存信息]" output "simple" "$LINE2" output "simple" "\n# 主要内存信息:" output "simple" "$ cat /proc/meminfo | grep -E 'MemTotal|MemFree|MemAvailable|Buffers|Cached'" cat /proc/meminfo | grep -E 'MemTotal|MemFree|MemAvailable|Buffers|Cached' >> "$SIMPLE_FILE" output "simple" "" output "simple" "$ free -h" free -h >> "$SIMPLE_FILE" output "simple" "$LINE2" output "simple" "$LINE1" } show_disk_full(){ # 完整版 output "full" "" output "full" "" output "full" "$LINE1" output "full" "\t\t\t\t\t\t\t\t[磁盘信息]" output "full" "$LINE2" output "full" "\n# 分区表信息:" output "full" "$ fdisk -l" fdisk -l >> "$FULL_FILE" output "full" "\n# 块设备信息:" output "full" "$ lsblk" lsblk >> "$FULL_FILE" output "full" "\n# 磁盘使用情况:" output "full" "$ df -hT" df -hT >> "$FULL_FILE" output "full" "$LINE2" output "full" "$LINE1" } show_disk_simple(){ # 精简版 output "simple" "" output "simple" "" output "simple" "$LINE1" output "simple" "\t\t\t\t\t\t\t\t[磁盘信息]" output "simple" "$LINE2" output "simple" "\n# 分区表信息:" output "simple" "$ fdisk -l 2>/dev/null" fdisk -l 2>/dev/null >> "$SIMPLE_FILE" output "simple" "\n# 块设备信息:" output "simple" "$ lsblk -o NAME,FSTYPE,SIZE,MOUNTPOINT,LABEL,UUID" lsblk -o NAME,FSTYPE,SIZE,MOUNTPOINT,LABEL,UUID >> "$SIMPLE_FILE" output "simple" "\n# 磁盘使用情况:" output "simple" "$ df -hT" df -hT >> "$SIMPLE_FILE" output "simple" "$LINE2" output "simple" "$LINE1" } show_network_full(){ # 完整版 output "full" "" output "full" "" output "full" "$LINE1" output "full" "\t\t\t\t\t\t\t\t[网络信息]" output "full" "$LINE2" output "full" "\n# 主机名解析:" output "full" "$ cat /etc/hostname" cat /etc/hostname >> "$FULL_FILE" output "full" "\n# 查看网络信息:" output "full" "$ ifconfig -a" ifconfig -a >> "$FULL_FILE" 2>/dev/null output "full" "\n# IP地址信息:" output "full" "$ ip addr show" ip addr show >> "$FULL_FILE" output "full" "\n# 路由表信息:" output "full" "$ ip route show" ip route show >> "$FULL_FILE" output "full" "\n# 路由接口信息:" output "full" "$ ip -s link" ip -s link >> "$FULL_FILE" ip route show >> "$FULL_FILE" output "full" "\n# 网络连接信息:" output "full" "$ ss -tulnp" ss -tulnp >> "$FULL_FILE" output "full" "\n# 防火墙状态:" if command -v ufw &>/dev/null; then output "full" "$ ufw status verbose" ufw status verbose >> "$FULL_FILE" elif command -v firewall-cmd &>/dev/null; then output "full" "$ firewall-cmd --state" firewall-cmd --state >> "$FULL_FILE" else output "full" "未检测到常用防火墙工具" fi output "full" "\n# DNS解析信息:" output "full" "$ cat /etc/resolv.conf" cat /etc/resolv.conf >> "$FULL_FILE" output "full" "$LINE2" output "full" "$LINE1" } show_network_simple(){ # 精简版 output "simple" "" output "simple" "" output "simple" "$LINE1" output "simple" "\t\t\t\t\t\t\t\t[网络信息]" output "simple" "$LINE2" output "simple" "\n# 网络接口简况:" output "simple" "$ ip -br addr" ip -br addr >> "$SIMPLE_FILE" output "simple" "$LINE2" output "simple" "$LINE1" } show_packages_both(){ output "both" "\n[软件包信息]" output "both" "$LINE1" if command -v dpkg &>/dev/null; then # Debian/Ubuntu系统 output "both" "\n# 已安装软件包数:" dpkg -l | grep '^ii' | wc -l | tee -a "$FULL_FILE" >> "$SIMPLE_FILE" output "package" "# Debian软件包列表" output "package" "Package\tVersion\tArchitecture" dpkg-query -W -f='${Package}\t${Version}\t${Architecture}\n' | sort >> "$PACKAGES_FILE" elif command -v rpm &>/dev/null; then # RHEL/CentOS系统 output "both" "\n# 已安装软件包数:" rpm -qa | wc -l | tee -a "$FULL_FILE" >> "$SIMPLE_FILE" output "package" "# RPM软件包列表" output "package" "Name\tVersion\tRelease\tArch" rpm -qa --queryformat='%{NAME}\t%{VERSION}\t%{RELEASE}\t%{ARCH}\n' | sort >> "$PACKAGES_FILE" else output "both" "无法确定包管理器类型" fi output "display" "\n软件包列表已保存到: $PACKAGES_FILE" } show_security_full(){ # 完整版 output "full" "" output "full" "" output "full" "$LINE1" output "full" "\t\t\t\t\t\t\t\t[安全信息]" output "full" "$LINE2" output "full" "\n# 登录用户历史:" output "full" "$ last -n 20" last -n 20 >> "$FULL_FILE" output "full" "$LINE2" output "full" "$LINE1" } show_security_simple(){ # 精简版 output "simple" "" output "simple" "" output "simple" "$LINE1" output "simple" "\t\t\t\t\t\t\t\t[安全信息]" output "simple" "$LINE2" output "simple" "\n# 当前登录用户:" output "simple" "$ who" who >> "$SIMPLE_FILE" output "simple" "$LINE2" output "simple" "$LINE1" } # ---------------------------------------------- # 主执行流程 # ---------------------------------------------- main(){ clear check_root init_files # 显示开始信息 output "display" "$BLUE正在收集系统信息...$RESET" output "display" "完整报告将保存到:$ORANGE $FULL_FILE $RESET" output "display" "精简报告将保存到:$ORANGE $SIMPLE_FILE $RESET" # 执行信息收集 show_os_full show_cpu_full show_memory_full show_disk_full show_network_full show_security_full show_os_simple show_cpu_simple show_memory_simple show_disk_simple show_network_simple show_security_simple show_packages_both # 设置文件权限 sudo chmod 777 "$FULL_FILE" "$SIMPLE_FILE" "$PACKAGES_FILE" # 显示完成信息 output "display" "\n$GREEN系统信息收集完成!$RESET" output "display" "文件大小统计:" du -h "$FULL_FILE" "$SIMPLE_FILE" "$PACKAGES_FILE" | tee -a "$FULL_FILE" } # 执行主函数 main
Linux常用命令之文件处理
文件管理
查看文件信息:ls
切换工作目录:cd
显示当前目录路径:pwd
创建新目录:mkdir
创建空文件:touch
删除文件或目录:rm
拷贝:cp
移动/重命名:mv
建立文件链接:ln
查找文件:find
查找文件内容:cat\less\more\head\tail
打包压缩:tar
文本处理
文本编辑:vi/vim
屏幕输出:echo
输出重定向:>
修改文件权限
r;读权限read-4
w:写权限write-2
x:执行权限exeute-1
-:无权限-0
chmod 777 文件名
查看网卡信息
测试远程主机的流动性
ping
-c:ping的次数
-i:每次ping的时间间隔
打印linux网络网络的状态信息
netstat
-t:列出所有tcp
-n:以数字形式显示地址和端口
-p:显示进程的pid和名字